Product Review and How To: DIY with Retique It Paint
My design philosophy starts with enhancing and embracing existing beauty. Repurposing furniture and decor is a great way to tell a story in your space. Not to mention, it is more budget conscious and sustainable for the planet than buying all new!
When you first start hunting for vintage treasures, you might be confused… You’ll see a lot of older pieces that seem to be beat up and worse for wear. But stick with me! I will show you how to see past the wear and tear, and envision the potential of a piece of furniture. With just a little bit of TLC and a few great products, you can create a DIY masterpiece that will have a place in your home for years to come.
One of the easiest ways to dress up an older piece of furniture is to add a wood grain DIY with Retique It paint. I recently painted a like-new wood finish on some end tables and a dresser. Keep reading for my product review and how-to!
Before DIY With Retique It
I love a good trip to the thrift store. There’s nothing better than going through all of the abandoned items to find the one diamond to shine up. Most of my best DIY projects began with a leisurely stroll through the thrift store.
But this particular project began on Facebook of all places! Each of these end tables were just $20 – so I knew I had to pick them up for my client’s Airbnb. They will be used along with the client’s existing dresser, which was a dark, dated, shiny mahogany. You won’t believe the transformation!
The Process
Here’s the short and sweet version, but keep reading for more details!
Step 1. Remove Hardware.
Step 2. Clean furniture with rubbing alcohol. Sand if needed, to remove any chipping paint.
Step 3. Paint, 2 coats.
Step 4. Add wood grain texture.
Step 5. Stain, then wipe.
Step 6. Wax.
Step 7. Seal. *Optional
If you want to see the whole process in action, check out my latest video! And for even more helpful application tips, check out this video from Retique It.
The very first step to any furniture painting process is to remove the hardware from the furniture. While you’re at it, why not upgrade? Sometimes, you might want to completely swap out the existing hardware for something more modern. In this case, I liked the overall shape and style of the existing hardware, so I simply painted them with a new metallic silver finish. Brass would’ve looked great too, but I opted for the more traditional silver look this time! Once the hardware was removed and painted, I was ready to paint the furniture itself.
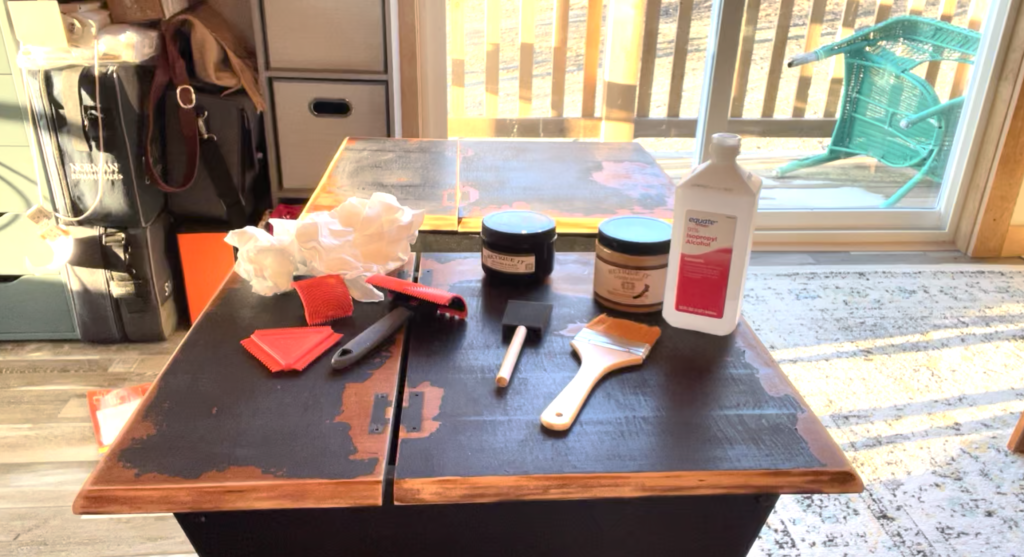
The Products
I purchased a kit from Amazon this time. But I also highly recommend checking out the wide variety of products available directly on the Retique It website. To recreate my results, you will need:
- Liquid Wood Paint. I used the color “Light Wood,” available here.
- Stain. I used Black Walnut, available here. But you can have fun with your color selection. Try out different combinations and see what you think!
- Brush. I used their “Wonder Brush.” I only wonder what it’s called that.
- Foam Brush. Any foam brush like this one will do.
- Graining Tool. This is how you achieve that real wood luck! I like that they offer different sizes so you can get all the nooks and crannies. Available here.
Application Tips: Retique It paint DIY
When you use Retique It liquid wood, it isn’t necessary to prep the surface with sanding or primer. Just clean the piece with rubbing alcohol and you’ll be good to go. That said, if the existing paint is chipping, you will want to lightly sand it so that you have a smooth surface. I painted directly on the shiny dresser surface, and was very pleased with how well it worked! My only criticism would be that you can see some brush strokes.
If using the “Light Wood” color like I did, I definitely recommend two coats of paint. Allow your first coat to dry for about 2-3 hours before applying the second coat. Once the second coat is on, wait about 5 minutes before using the graining tool. That will ensure that none of the previous surface will show through.
After staining, the longer you leave the stain, the darker it will be. So your timing will depend on the look that you’re going for. When wiping, be light and go with the grain. You want to use smooth, steady strokes.
There are two ways to finish your new painted piece. Just wax will appear like a more natural wood. Using a sealer (like I did) will give you a more finished look.
Be aware! If you let the wax sit too long before buffing, it will take some major elbow grease to get it off. I recommend buffing shortly after waxing. Also, the Retique It wax is very stinky. You will want to use a fan or apply the wax in a well-ventilated area.
Have fun!
Bonus Tips For Repurposing Furniture
I hope you enjoy your next project, painting a beautiful wood grain piece. If you’re inspired to try something else, why not try out peel and stick wallpaper?
There are so many great designs of peel and stick wallpaper out there – and so many ways to use it. Plus, it’s relatively easy to apply and very forgiving for beginners.

Dress up a drawer face or transform the interior of a display cabinet. Add whimsy, pattern, and eye-catching details. Let your creativity run free!
Here are some of my favorite peel and stick products:
- Everything on Spoonflower. I love love love the fun prints and beautiful designs from independent artists. Plus, you can get corresponding fabric for pillows, curtains, or lampshades!
- Woven wallpaper like this one from Scott Living. The texture of this peel and stick wallpaper is sophisticated, without being boring.
- Pro tip! Avoid the peel and stick wallpapers from York. They are thin – making the product cheap-looking and hard to apply.
Did you try any of the ideas in this blog?? Send me pics! I would love to see your creations.
Stay tuned…
For my next trick, I will be playing with Fusion Mineral paint. I can’t wait to see how it turns out.
Not having much luck with DIY? Let me DIFY (do it for you)!